ROBOTC has a Joystick Control option built into the interactive debugger. "Joystick Control" displays information received from an attached joystick and allows you to change which joystick is being used.
ROBOTC can access the values provided by the joystick controller's buttons, joysticks, and top-hat (depending on the specific joystick you are using) for use in programming. Below is a typical joystick controller layout and the values used by ROBOTC to access the joysticks, buttons, and top-hat.


There are a couple of steps that will need to be followed in order to configure a ROBOTC program for use with a Joystick Controller.
1) Before you can use the Joystick Controller with a ROBOTC program, you must first include a special driver that will be used to access the joystick's values. This driver is named "JoystickDriver.", and can be included in the program with the following line: #include "JoystickDriver.c"

2) Since the joystick values will need to be constantly updated in the program, you will want to put all of the joystick commands inside of a loop (in this case, and infinite while loop).

3) You will need to use the getJoystickSetting(joystick); command to refresh the joystick's values, before the values are used in the program. This line should be at the top of the while loop.

4) Finally, fill in the rest of the code with the joystick, button, and top-hat commands found in the getJoystickSettings page.Virtual Worlds Remote Control- VEX Robotics page.

Once the program is complete, plug the joystick controller into to computer and download the program to the robot. Once the Program Debug Window appears, you will need to open the Joystick Control Debugger Window.
You MUST have this debugger window open to use joysticks in your program.
A ROBOTC program WILL NOT receive any input from joysticks unless you have this debugger window open.
There are two ways to open the Joystick Control Debugger window; either by manually opening it through the 'Robot -> Debugger Windows -> Joystick Control - Basic' menu option (once the program is downloaded to the Virtual World):
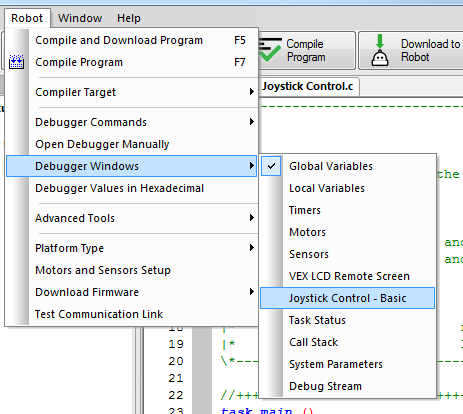
Or by placing a #pragma DebuggerWindows("joystickSimple") command below the rest of the #pragma statements in the program (before the program is downloaded to the Virtual World). You can find more information on the DebuggerWindows statements in the In ROBOTC, users may find the need to open certain debugger windows every time the program runs. Luckily, ROBOTC has a coding option that allows users to set certain debug windows to do just that: the DebuggerWindows () pragma statement. page.

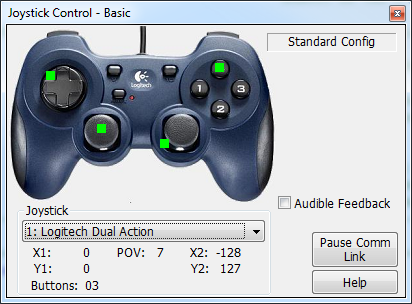
Once the Joystick Control window is opened, ROBOTC will look for any joysticks attached to your computer via USB. You can choose which joystick you want to robot to be controlled with by changing the joystick under the available drop-down menu.

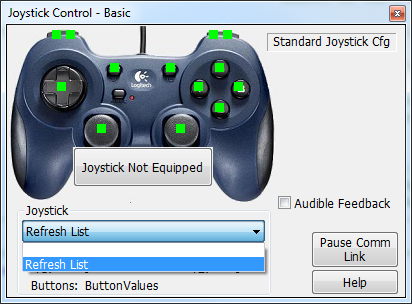
If you have no joysticks available, this list will be empty and ROBOTC will alert you that you have "No Controllers Configured". If you get this message and your joystick is plugged in, unplug the joystick, plug it back in, and select "Refresh List"
You can see what data is being generated by the Joystick Station by looking at the X1, Y1, POV, X2, Y2 and Buttons display directly below the drop down menu. This will give you real time feedback of what values are being sent to your Robot from the Joystick Station.
This data will also be illustrated with green dots to reflect the values and button presses on the joystick display.