- :-

Topics Covered

  • Automatic Pickup
  • Lesson Links

    Check Your Understanding:
    1. 1. When you want to have certain code run if a condition is met, but don’t have another section of code to run when the condition isn’t met, you can use a(n):
    2. A here-there conditional block
      An if conditional block
      This isn’t possible in ROBOTC
      A waitUntil command block
    3. 2. Why can’t the robot be controlled by the joysticks and running the automatic pickup sequence at the same time?
    4. Program flow is only at one spot in the program at any time. When the robot is running the automatic pickup sequence, program flow is there, preventing it from reaching the part of the code with joystick control.
      The robot is actually very slow, and cannot handle complex programs.
      The robot actually can be controlled by the joysticks and run the automatic pickup sequence at the same time. You just need to enable “Program Flow x2” in ROBOTC.
      The robot is actually running both parts of the program at the same time, it just doesn’t seem like it to human observers.
    Try It!
    Try it! 1

    LED Feedback for Automatic Pickup

    Just like the LED Feedback activity from the previous page, program the Touch LED to output colors depending on the actions the robot is performing.

    Green when the robot is running the automatic pickup sequence, yellow when the robot is moving forward based on a button press, and blue when the robot is being remotely controlled using the joysticks. Try it!

    Mini Challenge

    Mini Challenge 1: Advanced Automatic Pickup

    The automatic pickup behavior only works if the robot starts with its arm down and claw in the open position. Expand on your existing program, so that the robot makes sure to lower its arm and open the claw before moving forward to pick up an object!
    • Modify your program so that it:
      • Lowers its arm and open the claw before moving forward to pick up an object
    • Place your robot near an object, and test it for two cases:
      • Case1: Start out with the robot's arm raised all the way up
      • Case2: Start out with the robot's arm placed down

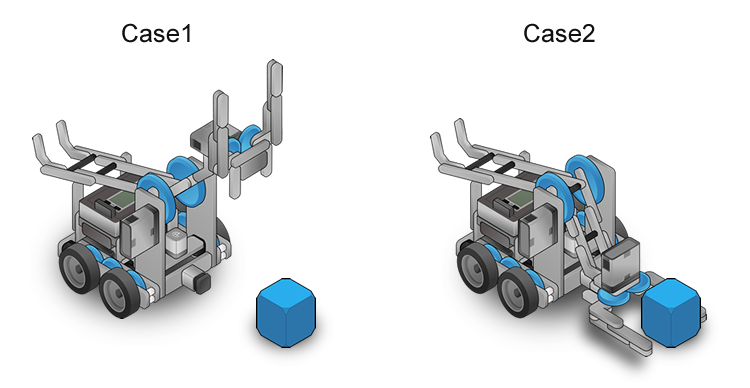
    You can lower the arm until the bump switch is pressed in to confirm that the arm is in the downward position.

    You can open the claw for a certain amount of time, rather than degrees, to prevent program flow from getting stuck at that point in the program.

    + hint